Take Your ViewSonic to the Next Level: Screen Share, Throw, & Cast
- Ceres EdTech

- Jun 3, 2024
- 2 min read

Did you know that you can Screen Share and Throw or send image/files to your ViewSonic myViewBoard Whiteboard screen? You can also share out to your students devices!
Here are the steps to walk you through these different options:
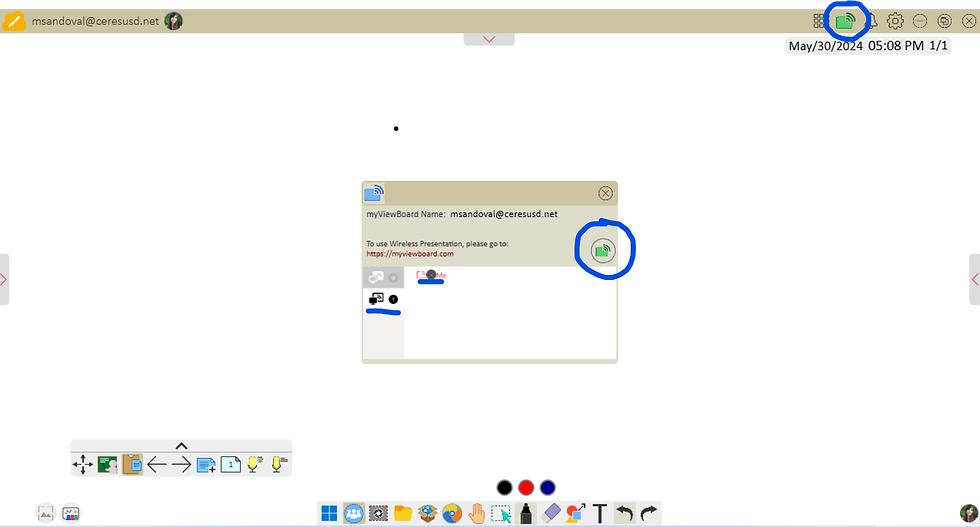
Locate You myViewBoard Name
Open your myViewBoard Whiteboard tool
Click the wireless presentation/screen share icon
Make note of your myViewBoard name

Access the myViewBoard Portal
Browse to the link myviewboard.com/type your myViewBoard name here and you will see the “Whiteboard Portal” page
Example link: myviewboard.com/msandoval@ceresusd.net
Type your name and click "Confirm"
To Screen Share
Click "Screen Sharing" to Share a screen
Choose how you want to share and select the screen to share
Click "Share"

To Allow the Shared Screen to Display on the myViewBoard Whiteboard
Open your myViewBoard Whiteboard tool
Click the “Wireless Presentation” icon icon at the upper right hand corner
Click the "Wireless" icon on the pop up screen to enable it (turns green)
Click the "Present In" option on the pop up screen and select the screen you would like to present

To Throw
Click the red "+Upload" button to browse and select your image
Note: when throwing an image, once you click to select your image it will automatically send
To View & Access the "Throw" files in myViewBoard Whiteboard
Open your myViewBoard Whiteboard tool
Click the “Notification” icon or bell icon at the upper right hand corner
Click on the file to load it
Select it to Insert it onto the whiteboard

How to Cast to Students Devices
Follow the steps in the video below!
Disclaimer: Once students know your myViewBoard name they can present at any time under any name. Be sure to look at the preview option to check to make sure what they are sharing is appropriate before loading.
Here is are a few additional resources for you!


Comments